QuPath - Exporting images
A variety of ways of exporting images, masks, subsections of images
Quick links:
tileExporter - Exporting tiles without creating tiles
Masks - using a LabeledImageServer
SVG - Export annotations as vectors
Regions: using sub-sections of an image
Overlays - save downsampled images of your results
Modify viewer settings via script
GUI export options
The File menu contains a bunch of export options - but what do they all do?

Export Snapshot options: Top Left - Main window content, Top Right - Current viewer content (SVG), Bottom left - Main window screenshot, Bottom right - Current viewer content.
File->Export snapshot
These four options take a quick snapshot of various regions of QuPath. “Main window screenshot” (Green outline on the right) is the entire QuPath window along with whatever sub menus or dialogs might be open in front of it, while “ Main window content” (Blue outline) only includes the full QuPath interface without any other dialog boxes. The “Current viewer content” (Orange outline) content includes the full image overlay including the scale bar and other Viewer components, while the “Current viewer content (SVG)” (Magenta outline) only includes objects and the original image.
File->Export images
These functions will either attempt to use the whole currently open image, or, if an annotation is selected, the bounding box of that annotation.
Original pixels: Output the image in a variety of formats. Often not possible without downsampling if you are using whole slide images.
Rendered RGB (with overlays): The original image plus the overlay as it is currently visible. If you change the overlay (like turning detection visibility off) the resulting image will reflect your changes.
OME TIFF: Restricted to one file type, unlike the first option, but now you can create pyramidal images, which allows you to export whole slide images. This option can take some time. Also, even with compression, there will often be a dramatic increase in file size if the original image was JPEG compressed. Most standard whole slide formats like NDPI and SVS incorporate JPEG compression.
Rendered SVG: SVG is a particular format that does a good job of showing polygons and lines through a variety of different magnifications as it records the points (vector based) rather than recording pixels. An exported SVG image will only have the overlay (objects), not the background image.
Simple image writing
Most of the simplest ways of recreating the effects from the above interface options can be found in the official documents under exporting images through scripting. These short scripts will generally follow the structure commandName(data here, file location/file name here).
There are some tricks to figuring out other export options - for example I will use the test case of a request on the forum to export the label images associated with whole slide images. Many file types are not single images, but potentially very complex organizations of sub-images. Many commercial file types at lesat have a macro image (snapshot of the entire slide), with some also having label and thumbnail images as well.
In order to figure out how to export the label images from the whole slide images, I used a set of commands to decipher where the data was stored and what I might do with it. As seen in the forum thread I did not get the easiest answer the first time, which is why it can be very beneficial to post your code even if it works - there may be a better way! The place I started was the current ImageServer, since that is where most of the information about the image is stored. Think of it as serving you information about the image.
describe(getCurentImageServer())
print(getCurentImageServer().getAssociatedImageList())
describe(getCurentImageServer().getAssociatedImage('label'))
With that information, I was able to come up with my first script, writing the image out through ImageJ. However, it turned out to be even easier than that, as once I was able to "get" the associated image, I could write out the image directly using the very straightforward writeImage() as shown below. As mentioned on the forum, the String 'label' needs to match with the appropriate image shown in the Image tab of QuPath.
If any of the file writing code below feels confusing, the page on interacting with the file system via QuPath might help.
import ij.*

def name = getCurrentImageNameWithoutExtension()+"_Label.png"
img = getCurrentServer().getAssociatedImage('label')

def pathOutput = buildFilePath(PROJECT_BASE_DIR, 'Labels')
mkdirs(pathOutput)
def outputFile = buildFilePath(PROJECT_BASE_DIR, 'Labels', name)
writeImage(img, outputFile)
print("Done saving \n"+name+ "\nin " + pathOutput)
tileExporter - Exporting tiles without creating tiles
Most of the necessary information about using the tile exporter is contained within the official documentation. There are some tricks that can be found on the forum, though.
1. The Tile exporter uses its own tiles, NOT any tiles you may have created. It also uses the bounding box of whatever annotation you may pass to it. This behavior often confuses people as they will end up with many blank tiles that do not overlap with their annotation.
2. As of 0.3.0, the tileExporter function will have a region parameter as an option, see more about creating and using regions here. That will allow certain annotations to be selected for export, rather than all of them (via getting the correct annotations, converting them into ROIs, and in turn RegionRequests, followed by passing the Region to the tileExporter).
3. If you only want tiles that overlap with your annotation to be exported, there are several options for workarounds that I posted here.
4. The tileExporter has two mask options described in more detail in the next section. Roughly speaking, they allow you to create masks with values for particular classes of annotation via a LabeledImageServer (also usable with standard image export options), or you can have each object's mask have a unique value by adding .useCells() and .useUniqueLabels().
Masks - using a LabeledImageServer
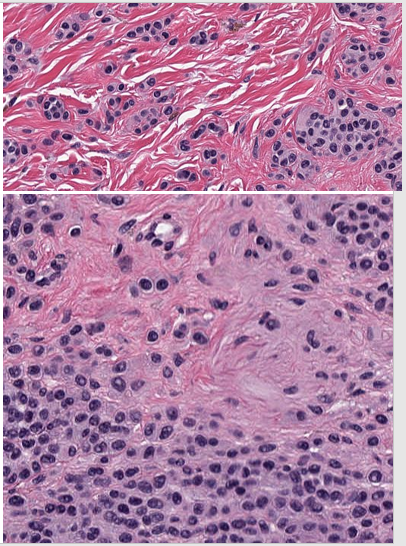
Regions of class Tumor are written out using writeImageRegion

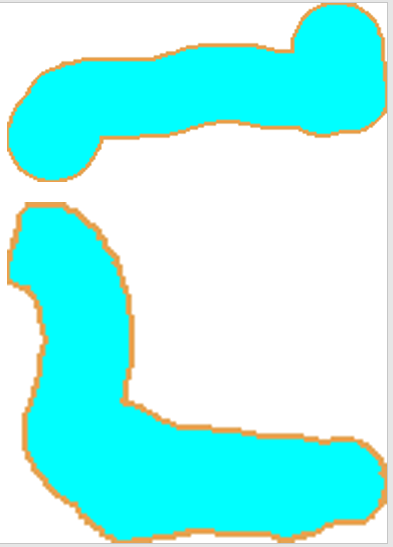
Same regions written out using writeRenderedImageRegion - there are two types of annotations, cyan is classified as Tumor. The unclassified annotations contain cells.
writeImageRegion used for Tumor annotations again, but passed a LabeledImageServer with a label set for the cyan annotations and a boundary label set

writeImageRegion used but passed a LabeledImageServer with useCells() and useUniqueLabels() set. The region used was for the classified annotations, so there is extra whitespace to the side of the cell labels where there are no cells, as seen in the second image.
There are two main options for exporting annotations as masks - a binary image showing where there is or is not an annotation, or a grayscale image where each individual mask is a particular value. For the latter option, think nuclei - a binary mask of cells is less useful for segmentation training since two touching nuclei would be merged together. In the images above, the third image shows a fairly standard mask export, although often the .setBoundaryLabel() will not be used to generate the orange outline. The output image itself is actually 8bit - not color RGB, and can be used in other software or as training labels for a deep learning algorithm.
The LabelImageServer can be used either with the standard writeImage() and writeImageRegion(), or with the tileExporter - simply replace the “server” that is passed first with a LabeledImageServer.
// 1 is full resolution. You may want something more like 20 or higher for small thumbnails
downsample = 1
//remove the findAll to get all annotations, or change the null to getPathClass("Tumor") to only export Tumor annotations
annotations = getAnnotationObjects().findAll{it.getPathClass() == null}

def imageName = GeneralTools.getNameWithoutExtension(getCurrentImageData().getServer().getMetadata().getName())
def imageData = getCurrentImageData()
//Make sure the location you want to save the files to exists - requires a Project
def pathOutput = buildFilePath(PROJECT_BASE_DIR, 'image_export')
mkdirs(pathOutput)
def cellLabelServer = new LabeledImageServer.Builder(imageData)
    .backgroundLabel(0, ColorTools.WHITE) // Specify background label (usually 0 or 255)
    .useCells()
    .useUniqueLabels()
    .downsample(downsample)    // Choose server resolution; this should match the resolution at which tiles are exported
    .multichannelOutput(false) // If true, each label refers to the channel of a multichannel binary image (required for multiclass probability)
    .build()
def annotationLabelServer = new LabeledImageServer.Builder(imageData)
    .backgroundLabel(0, ColorTools.WHITE) // Specify background label (usually 0 or 255)
    .addLabel('Tumor',1) //Each class requires a name and a number
    .downsample(downsample)    // Choose server resolution; this should match the resolution at which tiles are exported
    .multichannelOutput(false) // If true, each label refers to the channel of a multichannel binary image (required for multiclass probability)
    .build()


annotations.eachWithIndex{anno,x->
    roi = anno.getROI()
    def requestROI = RegionRequest.createInstance(getCurrentServer().getPath(), 1, roi)

    pathOutput = buildFilePath(PROJECT_BASE_DIR, 'image_export', imageName+"_region_"+x)
    //Now to export one image of each type per annotation (in the default case, unclassified

    //objects with overlays as seen in the Viewer
    writeRenderedImageRegion(getCurrentViewer(), requestROI, pathOutput+"_rendered.tif")
    //Labeled images, either cells or annotations
    writeImageRegion(annotationLabelServer, requestROI, pathOutput+"_annotationLabels.tif")
    writeImageRegion(cellLabelServer, requestROI, pathOutput+"_cellLabels.tif")

    //To get the image behind the objects, you would simply use writeImageRegion
    writeImageRegion(getCurrentServer(), requestROI, pathOutput+"_original.tif")

}
I have written this example to show that multiple labelServers can be used at once, and configured to accomplish different goals. Batch exporting summary thumbnails can be very straightforward using scripts like this one. Make sure to name the images different things so that they do not overwrite one another. If you are interested in all of the possible parameters for the labeledImageServer Builder, see here.
If you do use the unique labels option to export cells, keep in mind that it seems to default to a 16bit grayscale image with non-sequential unique labels. I had assumed when I first exported the images that the labels would be sequential! The image may also appear black or multicolored in Windows, I have seen a variety of effects. Opening the image in Fiji usually shows what I expect to see.
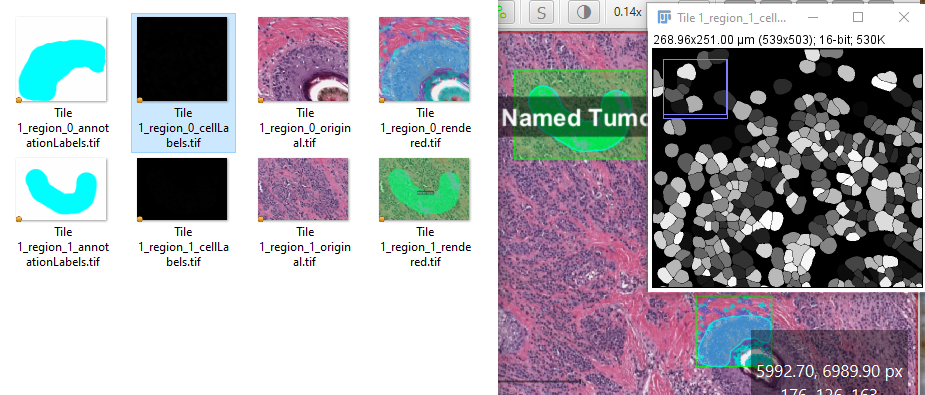
Example output from the script above showing the various exports and how the cellLabels images show up as black in Explorer but when opened in Fiji (right) they appear as labeled masks due to the automatic brightness and contrast adjustments.
Find even more great examples of using labels on the forum; there are more tricks than I could possibly cover here, and new tricks show up all the time!
Creating object labels with separators, instance labeling, and using predicates to select subsets of objects.
SVG - Export annotations as vectors
import qupath.lib.extension.svg.SvgTools.SvgBuilder

def imageData = getCurrentImageData()
def options = getCurrentViewer().getOverlayOptions()

def doc = new SvgBuilder()
    .imageData(imageData)
    .options(options)
    .downsample(1) // Increase if needed
    .createDocument()

def name = GeneralTools.getNameWithoutExtension(getProjectEntry().getImageName())
def path = buildFilePath(PROJECT_BASE_DIR, name + '.svg')

new File(path).text = doc
Further examples of parameters can be found below, or here in the code.
//Some other options to use with the SvgBuilder
.region(request) //try to make sure this line is first after the SvgBuilder
.showSelection(true) //highlight currently selected object
.embedImages() //Show original image beneath SVG overlay
Regions: using sub-sections of an image
Most image export types have a specific “region” function to export only part of the image. For example, writeImage() has writeImageRegion(), and writeRenderedImage() has writeRenderedImageRegion(). Regions are somewhat akin to ROIs, which are what are used to create them. You may have read elsewhere on the site that each area annotation and detection has an ROI object that defines its boundaries, but those ROIs are only one part of what makes an object an annotation or detection (the other primary one being the measurement lists). When passing a region to most functions, you are essentially passing a bounding box around that object - the smallest rectangle that object can fit inside of. The RegionRequest usually feeds directly into an image export function, ensuring that the region sent is something that can be written to an image file (at least as far as I understand it). The RegionRequest and bounding box behavior is what you see in action if you use the File->Export image… options while an annotation is selected.
In general, the only difference between the original function and the Region version of a function is that you add the Region as the second argument. Here is what creating an region and writing it looks like, modified from the official documentation here.
//Write out each region corresponding to an unclassified annotation
//Only use this if you have created SMALL unclassified annotations!!

def imageName = GeneralTools.getNameWithoutExtension(getCurrentImageData().getServer().getMetadata().getName())
//Make sure the location you want to save the files to exists - requires a Project
def pathOutput = buildFilePath(PROJECT_BASE_DIR, 'image_export')
mkdirs(pathOutput)

unclassifiedAnnotations = getAnnotationObjects().findAll{it.getPathClass() == null}

unclassifiedAnnotations.eachWithIndex{anno,x->
    //Name of the file and the path to where it goes in the Project
    fileName = pathOutput+"//"+imageName+ "region "+x+".tif"
    //For each annotation, we get its outline
    def roi = anno.getROI()
    //For each outline, we request the pixels within the bounding box of the annotation
    def requestROI = RegionRequest.createInstance(getCurrentServer().getPath(), 1, roi)
    //The 1 in the function above is the downsample, increase it for smaller images
    writeImageRegion(getCurrentServer(), requestROI, fileName)
}
In the last lines of the loop, you can see that writeImageRegion() takes the server, the RegionRequest, and the file path, while in writeImage(), in the link above, the function only takes a server and an output path.
Another example where exporting regions is helpful is when you have a lot of tile objects with classifications, either imported from the inference results of a deep learning classifier that handles whole tiles rather than pixels, or if you want to create training data for such a classifier. This post on the forum demonstrates using a script to cycle through all tile objects in an image, and then it exports them using the name of the tile's class in the file name. With the class in the file name, the exported tiles can be sorted as inputs for deep learning training.
Overlays - save downsampled images of your results
Source of code below: Result will be saved to a "rendered" folder within the project. Requires a project.
The primary variable to change manually is the double downsample =. The code can behave in one of two different ways. By default, it will use the viewer settings in each individual image (essentially "as you left them"). Alternatively, the script can be modified to use the currently open viewer settings by changing which of two code blocks is commented out (one offset with /// and the other commented out with /**/). Pete Bankhead maintains the original version, which operates more simply and exports every image based on the current viewer settings, here.
Alternatively, the reference to viewer.getOverlayOptions() could be replaced with options from farther down this page.
 Info
Info
import qupath.imagej.tools.IJTools
import qupath.lib.gui.images.servers.RenderedImageServer
import qupath.lib.gui.viewer.overlays.HierarchyOverlay
import qupath.lib.regions.RegionRequest

import static qupath.lib.gui.scripting.QPEx.*

// It is important to define the downsample!
// This is required to determine annotation line thicknesses
double downsample = 20

// Add the output file path here
String path = buildFilePath(PROJECT_BASE_DIR, 'rendered', getProjectEntry().getImageName() + '.png')

// Request the current viewer for settings, and current image (which may be used in batch processing)
def viewer = getCurrentViewer()
def imageData = getCurrentImageData()

//This code block will use individual viewer settings for each image
//- meaning you could turn off some channels in different images and the export would pick up on that
//Comment this block out and use the block below to use current viewer settings for all images
////////////////////////////////////////////////////

def display = qupath.lib.display.ImageDisplay.create(imageData)
//Source: https://forum.image.sc/t/qupath-macro-to-export-full-image-as-jpeg-doesnt-work-anymore-on-qupath-v0-5-0/91179/2?u=mike_nelson
//Prior to version 0.5.0 use the following
//def display = new qupath.lib.display.ImageDisplay(imageData)
// Create a rendered server that includes a hierarchy overlay using the current display settings
def server = new RenderedImageServer.Builder(imageData)
    .display(display)
    .downsamples(downsample)
    .layers(new HierarchyOverlay(viewer.getImageRegionStore(), viewer.getOverlayOptions(), imageData))
    .build()
/////////////////////////////////////////////////////

// Comment out the above code and use this code to use the SAME viewer settings as the current viewer
/**************************************************
// Create a rendered server that includes a hierarchy overlay using the current display settings
def server = new RenderedImageServer.Builder(imageData)
    .downsamples(downsample)
    .layers(new HierarchyOverlay(viewer.getImageRegionStore(), viewer.getOverlayOptions(), imageData))
    .build()
*****************************************************/
// Write or display the rendered image
if (path != null) {
    mkdirs(new File(path).getParent())
    writeImage(server, path)
} else
    IJTools.convertToImagePlus(server, RegionRequest.createInstance(server)).getImage().show()
Measurement map exports
Source of code: Sometimes a small overview image including one of the measurement maps can make for a great visual. Even better when you can quickly generate these images across an entire project. Make sure to edit the variables at the top of the script!!
//For QuPath V0.3.0
//Modified by Michael S Nelson, July 2021
////////////////////////////////////////////////////////////////////////////////////////////////////////////////////////////////////////
////////////////////////////////////////////////////////////////////////////////////////////////////////////////////////////////////////
// Define the color map name
String colorMapName = "Viridis"
// Define measurement & display range
def measurement = "Nucleus: Circularity" // Set to null to reset

//SETTING MIN AND MAX IS VERY IMPORTANT -
//THEY WILL CHANGE GREATLY DEPENDING ON THE MEASUREMENT SELECTED
double minValue = 0.0
double maxValue = 1.0
// It is important to define the downsample!
// This is required to determine annotation line thicknesses
double downsample = 20
////////////////////////////////////////////////////////////////////////////////////////////////////////////////////////////////////////
////////////////////////////////////////////////////////////////////////////////////////////////////////////////////////////////////////


//Leave this section uncommented to access default color maps
////////////////////////////////////////////////////////////////////
colorMapper = ColorMaps.getColorMaps().find {it.getKey() == colorMapName}.getValue()
////////////////////////////////////////////////////////////////////


//Use this section to find the color map if you have created your own colormap
////////////////////////////////////////////////////////////////////
//String userPath = PathPrefs.getUserPath();
//Path dirUser = Paths.get(userPath, "colormaps");
//colorMapper =ColorMaps.loadColorMapsFromDirectory(dirUser).find {it.getName() == colorMapName}
////////////////////////////////////////////////////////////////////

//Great, we have the color map at this point, if it exists.

def viewer = getCurrentViewer()
def options = viewer.getOverlayOptions()
def detections = getDetectionObjects()
def imageName = GeneralTools.getNameWithoutExtension(getProjectEntry().getImageName())

//Two options here, the one that works but requires "index" or a specific measurement, and the one that tries to find out what the currently selected measurement in the dialog is. The latter fails.
//def mapper = options.getMeasurementMapper()
def mapper = new MeasurementMapper(colorMapper, measurement, detections)
mapper.setDisplayMinValue(minValue)
mapper.setDisplayMaxValue(maxValue)
options.setMeasurementMapper(mapper)

// Now export the rendered image


// Add the output file path here
String path = buildFilePath(PROJECT_BASE_DIR, 'rendered')
mkdirs(path)

// Request the current viewer for settings, and current image (which may be used in batch processing)
def imageData = getCurrentImageData()

// Create a rendered server that includes a hierarchy overlay using the current display settings
def server = new RenderedImageServer.Builder(imageData)
    .downsamples(downsample)
    .layers(new HierarchyOverlay(null, options, imageData))
    .build()

//Export the whole image
////////////////////////////////////////////////////////////////
def path2 = buildFilePath(path, imageName+".png")
writeImage(server, path2)
////////////////////////////////////////////////////////////////


// Export each annotation separately
/*
int count = 0
for (annotation in getAnnotationObjects()) {
    count++
    def imageName = imageName +"_"+ count + '.png'
    def path2 = buildFilePath(path, imageName)
    def region = RegionRequest.createInstance(server.getPath(), downsample, annotation.getROI())
    writeImageRegion(server, region, path2)
}
*/
print "Done"

import qupath.lib.gui.tools.*
import java.nio.file.Paths;
import java.nio.file.Path;
import qupath.lib.gui.prefs.PathPrefs;
import qupath.lib.color.ColorMaps
import qupath.imagej.tools.IJTools
import qupath.lib.gui.images.servers.RenderedImageServer
import qupath.lib.gui.viewer.overlays.HierarchyOverlay
import qupath.lib.regions.RegionRequest
Modify the Viewer settings via script
The Viewer has a lot of settings that can be manually selected when exporting images. Want to toggle Annotation Names on, but detection visibility off for your export each time without worrying about whether you remembered to set that in the interface? Then this is the section for you.
options = getCurrentViewer().getOverlayOptions()
describe(options)

Some of the more useful Viewer manipulation options
I am not going to go through all of them, as you can print them out on your own with the above script, but I will show a couple of examples of how to use them. The main functions you will be interested in are the “void set” functions. These are fairly self explanatory and mostly require a “true” or “false” only.
You can show or hide all of the standard object types, names, the fill states, and even the “detection display mode” which changes whether cells show up as nuclei, whole cells, or symbols.
options = getCurrentViewer().getOverlayOptions()
print options.detectionDisplayModeProperty()
Printing a particular property shows what some of the possible options are. By changing the cell display mode in the interface (View menu), I can see that some of the values are NUCLEI_AND_BOUNDARIES, CENTROIDS, and NUCLEI_ONLY. These values could be used in the setDetectionDisplayMode() function shown to the right. A quick group of settings to turn annotations off, annotation names on, cell detections on, and change cells to nuclei and “filled in” would look like the following.
options = getCurrentViewer().getOverlayOptions()
options.setOpacity(1.0)
options.setFillDetections(true)
options.setShowNames(true)
options.setDetectionDisplayMode(DetectionDisplayMode.NUCLEI_ONLY)
options.setShowAnnotations(false)
options.setShowDetections(true)
import qupath.lib.gui.viewer.OverlayOptions.DetectionDisplayMode
Note
Export pixel classifier predictions
The code and explanation for exporting Pixel classifier predictions (the overlay you see when the classifier is loaded) can be found in the Brightfield analysis Finishing and Export page.
Converting images to OME-TIFF via command line
Sometimes you may want to convert a regular, non pyramidal TIFF to a pyramidal OME-TIFF, or for some other reason want to convert image file types. Loading the images into a QuPath project tends to be slow, as is using them, which is one of the reasons file type conversion is desired in the first place! Targeting the image folder via the command line is one way to handle this, and is covered in the Command line and Python section. Images can be converted one at a time via regular command line, while a Python script is used to automate the conversion across many images.
The code for this conversion as of 0.2.3 can be found here, with descriptions earlier in the page about using the command line. I will not cover installing and setting up Python on this site. :(
Whole slide image export as OME.TIFF
Large images may be written out as OME.TIF files, either through the File menu as shown at the top of the page, or using scripting. The exact script used will vary somewhat depending on your use case, but the general format will look similar to the LabeledImageServer.
Examples can be found on the Image.sc forum:
Export whole slide images and add metadata
The raw code within QuPath - use to find useful Builder options
Using image ops to modify the bit depth in resulting images - useful for color deconvolution channles instead of RGB
Another example using ImageOps to add a Gaussian blur to the output
There are **NEW OPTIONS** available now to edit other options like the pixel type (uint8 vs uint16 etc.)
The format and some of the import options are as follows - though you need to determine the **server** and **pathOutput** as shown in other scripts. The downsampling also has other options as seen in links above.
println 'Writing OME-TIFF'
new OMEPyramidWriter.Builder(server)
        .parallelize()
        .tileSize(512)
        .scaledDownsampling(1, 4)
        .build()
        .writePyramid(pathOutput)

println 'Done!'

import qupath.lib.images.writers.ome.OMEPyramidWriter
Combinations and other related forum posts
Export tiles per class per annotation - dealing with overlapping annotations